Saturday, January 4, 2014

Outdoor Tree "Ornaments"

I wanted to switch up my outdoor Christmas decorations this year, and decided to make some lighted ornaments for my large tree outside. It turned out...okay. I wouldn't call it a "fail" but not my best work. I think it would have looked much better if there were a lot more ornaments, but I would have had to spend so much more money on extension cords (one for every ornament...that adds up!)

I started out by cutting sections of chicken wire, and forming them into (roughly) round shapes. Then, I wrapped a string of 100 lights on each one. I used two red, two green, and one clear string of lights. I'm normally strictly a clear-lights girl, but I thought it would help get the "ornaments" point across better! 


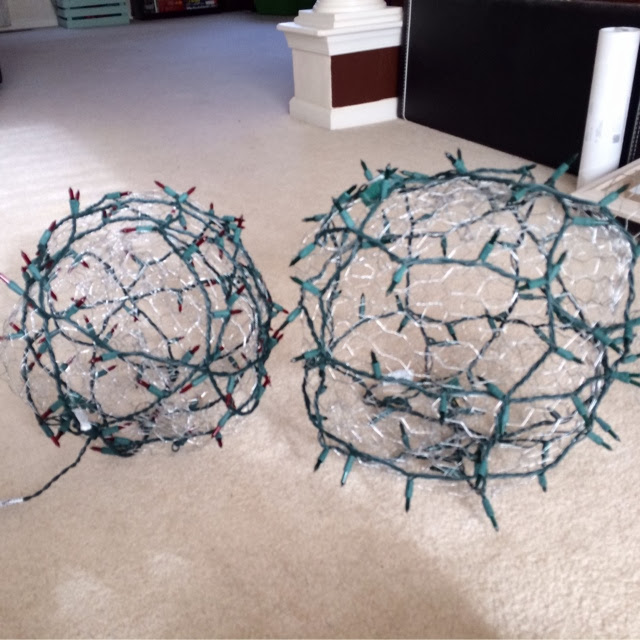
Okay, I admit this was pretty much a fail, but it wouldn't be right if I didn't post a fail every now and then right?!

Sunday, December 29, 2013

Mini Wreaths for every Season!

Plumbers insulation, not just for plumbing. Or insulation. They make perfect wreaths! And for much cheaper than the styrofoam wreath rings at craft stores. For Thanksgiving I wrapped some awesome green burlap ribbon around the pipe insulation and added some flowers I had from an old wreath I didn't like anymore. For Christmas I got some red ribbon, white flowers from the dollar store and a sprig of cranberries from Micheals. I need ideas on a "rest-of-the-year" wreath for my old window!


Saturday, December 14, 2013

Christmas Decor!

Christmas is my favorite time of year! I love decorating. I love lights. I love an excuse to bake cookies. This year I tried my best to tone down the colors in my living room and go for more of a Pottery Barn look. One new addition is my Noel sign inspired completely by this post that has been all over Pinterest:


I also painted this deer with sweet red glitter craft paint. Thanks Martha Stewart!

Printable Silhouette here.


Here are a few more decorations from this year:


Wednesday, December 4, 2013

Decorative Crate - Christmas Edition

My aforementioned crate has had a Christmas Makeover! Just a few sticks and pine cones from your (or in my case, your friend's) backyard, string lights, dollar store ornaments and ribbon & voila!

Friday, November 29, 2013

Super Classy Mini Pumpkins

My fall decorating style is changing from "Cheap Orange" and "Can't afford full priced items" to a somewhat more adult deco style. It took a lot of self control to not put out ALL of the random decorations out, but I went with a more subtle look this year.  Anyway, I had a bunch of these terrible dollar store mini pumpkins from last year and instead of throwing them away I decided to reuse them somehow. I painted them tan and beige, a la Pottery Barn. Then I added a little light blue so it matches my hallway tables. Super easy way to turn cheap into chic!


Saturday, November 23, 2013

Side Table Redo

A few months ago I had my very first yard sale. It was so exciting! I didn't sell all of the junk but I was so happy to get rid of our old coffee table & side tables. I was keeping them in the office and aside from totally hating them (glass tops are so 90s) they were also just taking up too much space. So naturally, after selling the table to clear space, I bought a side table to refinish and put in their place. This table cost $10.50 at Goodwill. $10.50!! I really had no choice, I HAD to get it.


I got a little excited and forgot to take the before picture and started painting. The hardware used is the original, it really didn't even need to be changed. To be honest, I hardly sanded it. One reason is that I hate sanding. That's actually the only reason. Sometimes wood stain bleeds through light colored paint (like this awesome off-white) but I knew I'd be doing two coats so I wasn't too worried about it. Of course once it was painted I had to sand the corners and edges to make it look old. I think it looks fabulous!


Sunday, November 17, 2013

Gallery Wall. Doggy Style.

Frame hoarding. It's happens suddenly and without warning. For me, it happened during the planning stages of my first gallery wall. I now have more frames than I have available wall space for. Anyway, here it is! As you can probably tell, I have Australian Shepherds. I had painted the two paintings of my dogs a while ago but didn't really know how to display them. (Yes-I'm a crazy dog lady). Then my craftiest friend suggested a gallery wall for my craft room! I found all the frames at thrift stores. I painted the black ones and the light gold one. Then I painted one of the mats the same light gold. Love!